Sunday, December 13, 2009

Say farewell to Vienna South Train Station

What the Viennese people always liked to do is to watch a moribund dying:
On 12.12.2009 the Vienna South Train Station was opened to the public for the last time. After that day the demolishion starts to make place for the new "Vienna Central Station". Many parts of the infrastructure were already removed as well as the famous "eyes".


Hundreds of photographers (including me) took the "last picture" of this train station which was built in its present form between 1955 and 1961 by architect Heinrich Hrdlicka. With the central building he combined the already existing stations "Vienna south" and "Vienna East", which were built in the 19th century and severely damaged in WWII.


More images by Michael Hierner (derstandard.at).
You can also explore an overview of the area in high resolution as well as see the monthly progress of the construction work.

Thursday, November 19, 2009

Swirl: Google Labs Image search


As usual when it comes to beta software, Swirl results can look a little messed up.
Still, it looks more promising to me than Visual Search.

Thursday, November 5, 2009

"We're All Gonna Die - 100 meters of existence"

(click image to visit the artist's homepage)

A photograph by Simon Høgsberg.
As a print, this image is 100m by 78cm. As the artist states, the panorama was shot "...in the course of 20 days from the same spot on a railroad bridge on the Warschauer Strasse in Berlin".
Only a few - but definitely some - noticed that they were photographed...

Saturday, October 31, 2009

Neues Panoramabuch von Thomas Bredenfeld


Ein Tipp für wissbegierige Panoramafotografen ist das in Deutsch geschriebene "Praxisbuch digitale Panoramafotografie" von Thomas Bredenfeld.
Das Buch ist sowohl bei Amazon als auch bei Galileo Design ab sofort bestellbar!

Sunday, October 25, 2009

Picnic on Sidney Harbor Bridge

Panorama by Peter Murpy
(click image to open panorama)

I'd like to see such a picnic being organized in Vienna! (What about the Reichsbrücke?)

Sunday, September 27, 2009

Gigapixel speedtest revised

A revised version of the Gigapixel Speedtest is now available!

The new version includes project files for PTGui and Autopano with comparable output size and format, so you can directly compare performance of both stitchers.

Please note that PTGui will perform much better in the new version. The main reason for this speedup is, that i have used the "crop" feature available in newer releases of PTGui. This complies with Autopano which will cut unnecessary image parts automatically.

To give you some figures, i have re-rendered the panorama with the new project on my reference system - meanwhile upgraded from Vista 32bit to Windows 7 64 bit:
  • old project on old system:
    2h, 38min
  • old project on updated system:
    1h, 24min (speed increase 1.88 - just by using 64bit!)
  • new project on updated system:
    57 minutes (speed increase 2,77 compared to old numbers!)

Tuesday, September 8, 2009

Ars Electronica Festival 2009 Panoramas


The panoramas from the 2009 event are online. Click the image above to enter the index.

Monday, August 17, 2009

Rundumblick vom Telekom-Tower Arsenal in Wien


Jetzt gibt es eine hochauflösendes (1,4 Gigapixel) 360 Grad Panorama vom Telekom-Tower im Arsenal online:


(Zum Ansehen wird Microsoft Silverlight oder HDView als Plugin benötigt.)


Sehr schön zu sehen sind die fortschreitenden Bauarbeiten für die Umwandlung des Südbahnhofs in den neuen Wiener Zentralbahnhof. Wie man sieht, ist das Gelände schon ziemlich "entkernt".

Zum Vergleich hier ein partielles Panorama vom September 2007:


Hat somit schon ein bisschen historischen Wert...

...Die diesjährige Aufnahme hatte ich eigentlich schon im April gemacht. Ich ich hatte aber noch gehofft, die 4 Teilpanoramen irgendwie nahtlos zusammenzubekommen, was sich leider als nicht wirklich machbar erwies. Dazu ist die Plattform des Towers und somit der Parallaxenfehler leider zu groß.

Monday, August 10, 2009

Hugin 0.8.0 released

The official version 0.8.0 of the open-source stitcher Hugin has been released.
See the download page at sourceforge or download a Windows version compiled by Allard Katan.

Of course, the new version has a bunch of new features added, but there are some which i consider worth a special mention:

* The new openGL preview window. - This is a big step towards visually oriented panorama editing!

Now you can drag and rotate the panorama with visual feedback and identify images by moving the mouse over the panorama.

Especially the latter was a desperately needed feature to edit my gigapixel panoramas: During photometric optimization (the only one available which actually functions in conjunction with de-vignetting) you have to define some well thought supporting images to prevent the optimizer tending towards pure white. Former versions only offered the option to "switch off" an image and recalculate the whole preview. For several hundred images this was simply useless.

* Celeste sky identification: A built-in engine which helps identifying and eliminating control points on moving objects. The release note says that this feature is currently trained to ignore clouds. As far as my tests revealed, it actually works - a promising and high-potential feature.

* Revamped batch processor: Still has some rough edges but it is already an useful tool for creating larger number of panoramas.

* "Official" GPU support for nona (the stiching engine): Well, i didn't give it a try yet, but i can't wait doing so ;-)

If you want to keep in touch with the latest developments regarding Hugin, also give "This week in panospace" - a blog by Yuval Levy a try...

Monday, July 13, 2009

Digital analogue photography

Zenza Bronica ETRSi (image by Kurt)

It's the fault of my father.
He endowed me a complete Zenza Bronica ETRSi Set...

So i started to remember the good old times - more than 20 years ago - when i shot B&W photos, developed them and enlarged them in the darkroom. I also started to remember the way of shooting: Every push of the button was well thought (mostly), no instant feedback and the magic of an image evolving from a lifeless piece of cellophane...
Hmm, i think i'm getting old...

Anyway - last weekend i started to reactivate the easier parts of this flashback, bought some rolls of Ilford HP5 and Delta 100 film, a Jobo tank and a Canon 8800F scanner to spare the pain of setting up a complete darkroom. (*1)

The Canon 8800F acts as a bridge between "old style" film photography and the digital world:
  • The scanner is the most cost efficient way to scan 120 film. It can process one strip at a time with 4 pcs. of 6x4.5 cm negatives.
  • The data sheet says, that it can scan up to 4800x9600 dpi - but even 2400dpi seem to stress the max. optical resolution of the scanner. Don't be tempted to compare it with a Nikon Coolscan with ~3800 dpi of true optical resolution ;-)
    Still, it is good enough for 645 as you'll get ~5 MPix at 1200 dpi and ~20 MPix at 2400 dpi
  • The good thing about this scanner is the quite high dynamic range it can capture. In most cases, you don't need multi-pass scanning to get a usable image from the negative.
  • Among other software, there is also a copy of Silverfast included in the package. Although the software is a little clumsy to use, it is worth the extra effort as it will deliver high quality images without having to immerse yourself deeply in the art of film scanning.

    Wolfgang - The Finez
    Ilford HP5+, Ilfosol 3 14+1, Canon 8800F@1200 dpi


(*1) If you also want to (re-)start with medium format film, here's my shopping list for developing roll film negatives:
  1. Jobo tank system 1500:
    • Tank - Item #1520 (tank complete with one reel)
    • Film washer "Cascade" Item #3350
    • Film wiper Item #3530
    • Film clips Item #3312
    • Bottles for chemicals, eg. Item #3380 or 2-3 bottles Item #3395
    • Graduate Item #3306
    • Thermometer, eg. Item #3322
    Price should not exceed 200 EUR for all items.

  2. Changing bag - e.g. Kaiser Wechselsack, ~32 EUR

  3. B&W film and chemicals:
    • Ilford HP5 or Delta 100, ~4 EUR/Roll
    • Developer: Ilford Ilfosol 3 (for Ilford HP5), ~10 EUR/500ml
    • Fixer: Ilford Rapid Fixer, ~8 EUR/500 ml
    • Misc: Stop bath and wetting agent, ~8 EUR/500 ml each (i personally prefer to rinse the tank instead of using a stop bath)
    Don't forget that the chemicals are hazardous waste. While the developer has chemical similarities to a washing agent, the fixer will cause mass mortality in your local sewage plant if you simply pour it in the kitchen sink...

Thursday, May 28, 2009

Sunday, April 26, 2009

Stereo-3D High Resolution Panorama Tests

This weekend i experimented with high resolution anaglyph panoramas. I tried to answer 2 questions that have been identified by me as most important:
- What stereo base to use for the left and right image
- Which suitable method to interconnect both panoramas to an anaglyph image

I have used the Gigapan device with a Canon G9 mounted. The stereo image was created by moving the tripod. Stitching with Autopano Giga 2 and PTGui, alignment with PTGui and manual Anaglyph creation with Gimp/PS.
It turned out that creating 2 identical panoramas was a bigger problem than expected, so i need to do some more experiments. Keep that in mind when exploring the panoramas below.

Here are 3 sample anaglyph panoramas. They are downsampled to approx. 50%, so processing the images was a little easier and faster. Click thumbnails to view the full panoramas (red-cyan glasses needed):

Meidling Train Station
Stereo base approx. 10 cm. Both panoramas were warped to fit without caring for a "consistent" stereo image. It is easiest to view but has some bent lamp poles and other inconsistencies.

Flak Tower 1
Stereo base approx. 1 meter. Good looking as a small image, but very difficult to view when zooming in. Such a panorama would need dynamic adjustment of the left and right image while viewing - just like done when at time of shooting in 3D-movies.


Flak Tower 2
Stereo base approx 10cm and manual adjustment of left and right layer to guarantee best possible viewing experience. Still - stitching inconsistenies are very noticeable.

Next step is to work with a 2 camera setup...

Thursday, April 23, 2009

Zenitar Fisheye 16mm f2.8

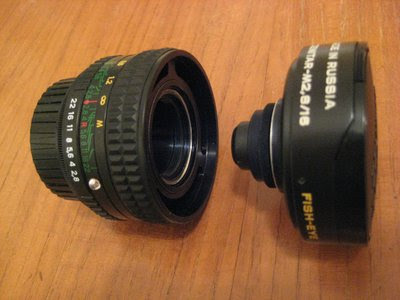
At last, my new Zenitar lens arrived. After waiting one month and paying off the minister of finance with additional 70 EUR, i have a full frame fisheye lens for my Nikon and M42 mount cameras.
The lens offers good value for the money, but you have to bring some things into order before using it the first time:
  • Clean the lens from grinding swarf. Don't forget it's Russian: high quality build, but apparently no final inspection before leaving the factory ;-)
  • Mount the adapter for non-M42 cameras.
  • Adjust focus ring for infinity on non-M42 cameras.
So, here is a tutorial how to adjust your Zenitar 16mm fisheye and prepare it for first use.

Caution: Work gently, do not force anything. If you use compressed air, keep some centimeters distance and avoid blowing at full power. Do not tighten the screws forcfully. The next grade after "tight" is "broken"!
Please don't forget that you will do the following steps at your own risk! Don't come wailing to me, complaining that you have ruined your lens!


What you need:
  • A set of of small screwdrivers
  • Bottle of compressed air
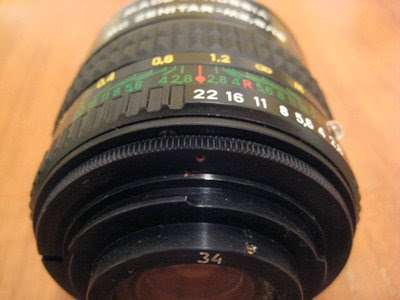
Cleaning the lens from grinding swarf
- First, you have to open the rearward mounting plate of the lens. Set aperture to f22. Remove the 3 screws and lift the plate
- Use adequate compressed air to remove the swarf. Blow into the side of the lens stack to remove particles that already rest on the lens surfaces.
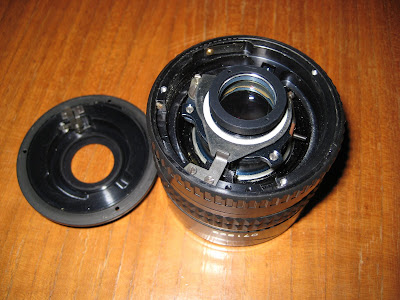
- Re-mount the plate. Take care to mount it accordingly, otherwise the lens diaphragm won't work. See below for correct position. The clip must extend into the lens on the right side of the pin. Carefully rotate the plate clockwise until the screw holes match. If you do it correctly, you can see the diaphragm opening while turning the plate into position.
- Re-apply the screws.
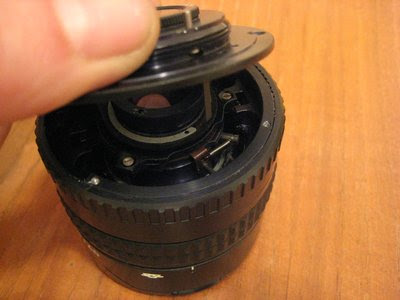
- Now unscrew the front part of the lens and clean the inside with compressed air.
- Re-mount the the front part.
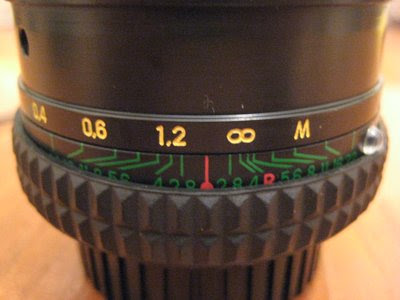

Mounting the adapter (Nikon)
There is a red dot on both sides of the adapter which has to align with the focus mark on the lens:

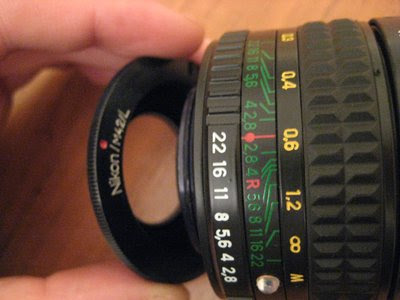
Screw in the adapter - then unscrew counterclockwise a few degrees until the marks align:
Fasten the small screw on the adapter to fix this position:

Adjust focus ring for infinity
- Set focus to infinity
- Now you have to move the focus rubber ring away from its position. That's best done with your fingernails and a little cautious force:
- This will reveal 3 holes with hidden screws. Loosen the screws (approx. one turn will be sufficient).
- Move the focus ring approx 2 degrees clockwise. In my example, i have selected the middle position between infinity and 1.2 meters. This should give enough headroom to focus even beyond infinity.
- Now carefully tighten the 3 screws, mount the lens on the camera and use a feature far away to focus to infinity. Use a piece of tape to fix the ring in this position and re-open the 3 screws.
- Remove the piece of tape. Align the focus marker and the infinity symbol and re-tighten the screws.

Now you're done! Enjoy your new Zenitar!

One downer at the end of the tutorial: On my Pentax ESII, for an unkown reason, the Zenitar sometimes blocks the shutter. I suspect, the rear filter housing extends too far into the camera and blocks the mirror. Unfortunately, the filter housing cannot be removed as it is part of the optical system of the lens. Any tipps how to circumvent this problem would be greatly appreciated....

Tuesday, April 14, 2009

Panoramas of the new Ars Electronica Building


Some panoramas photographed in April 2009 from the newly rebuilt Ars Electronica Center in Linz.
The building is located directly at the riverside of the Danube river and should resemble the shape of a ship (the topmost panorama shows the "ship deck", acting as an event space). Below the deck is the main exhibition hall.
The highest part of the building houses the "Deep Space" display system, the successor of the "Cave".

See more Ars Electronica Panoramas at the 360cities homepage.
Learn more about the Ars Electronica Center at the AEC home page.

Tuesday, March 24, 2009

5 months of U.S. Arctic research - a blog by Matt Nolan

Dr. Matt Nolan spent 5 months in the U.S. Arctic - mostly around the McCall Glacier - being part of the IPY4 (4th International Plar Year) expedition. He documented the research with 200 spherical panoramas and a dozen gigapixel images.

To view his work, you can visit his blog directly, or browse the low resolution panoramas on 360cities.net.

Sunday, March 15, 2009

Time's up


...für den Wiener Nordbahnhof. Das Gelände muß zu einem großen Teil einem Wohn- und Gewerbegebiet weichen.

Wednesday, March 11, 2009

Rich Internet Application Statistics

Click image to view stats at riastats.com

According to the Website, the data was collected by observing ~50.000 unique browser accesses per day - across 42 sites during the past 30 days.
(numbers edited, see comment below)

Thursday, March 5, 2009

Infinity Room, Museum of Contemporary Art, Sydney

Infinity Room - Phalli's Field, by Yayoi Kusama
Panorama by Peter Murphy

click image to open panorama at mediavr.com
Quicktime needed for display

click image to open panorama at mediavr.com
Quicktime needed for display